
Trying out Mastodon for fun
Trying it out in my own server instance. Now that's more fun, isn't it?


The story goes like this. Some extra time on my hands. Some extra credits remaining on Digitalocean. What to do?
Out of the never-ending treasury of all manner of ideas, what can I try out without too much hassle, and more importantly, within the span of an evening? Hmm.
Well, I won't bore away with the complex debate amongst choices, but long story short, why not try out deploying Mastodon in my own server, and let my friends use it for as long as the free credits are there. Sounds not too shabby, right? I knew you and me are on the same page. No wonder you read till here.
What do I have already?
I have a server instance (Digitalocean droplet)
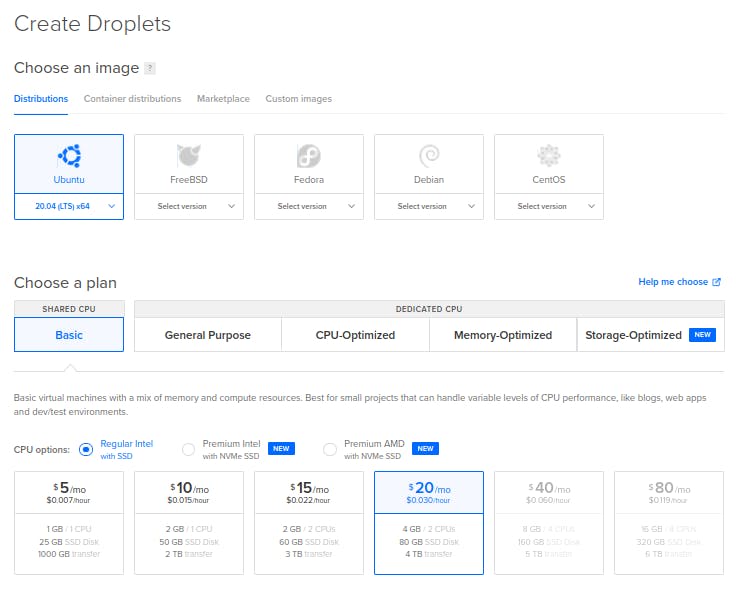
I created a Digitalocean droplet.
Distribution: Ubuntu 20.04 LTS x64
Choosing the "Basic Plan" and opting for a regular Intel with SSD.
Configuration: 4GB/80GB with 1TB transfer.
Total: $20/month
I also have a domain
I already have notgonnareveal.website domain already, from which I'm going to use a subdomain social.notgonnareveal.website
I also have a mail server
Well, deploying a mail server for a side project like this is a costly affair, but thankfully, I have a professional email, whose mail server I can use for this project without hassle.
Now what? Where to start, what to do?
1. SSH into the server
I got the IP of the droplet 168.33.44.55 (fake IP - sorry whoever actually is the owner of the droplet with this IP) and I ssh'd into it. Entered the correct password. And, voila I have a shell on the server.
ssh root@168.33.44.55
2. Update the server first before doing anything else
apt update && apt -y upgrade
3. Install NodeJS v12.x
curl -sL https://deb.nodesource.com/setup_12.x | bash -
4. Installing Yarn
curl -sS https://dl.yarnpkg.com/debian/pubkey.gpg | apt-key add -
echo "deb https://dl.yarnpkg.com/debian/ stable main" | tee /etc/apt/sources.list.d/yarn.list
5. Install other dependencies
apt update
apt install -y \
  imagemagick ffmpeg libpq-dev libxml2-dev libxslt1-dev file git-core \
  g++ libprotobuf-dev protobuf-compiler pkg-config nodejs gcc autoconf \
  bison build-essential libssl-dev libyaml-dev libreadline6-dev \
  zlib1g-dev libncurses5-dev libffi-dev libgdbm-dev \
  nginx redis-server redis-tools postgresql postgresql-contrib \
  certbot python3-certbot-nginx yarn libidn11-dev libicu-dev libjemalloc-dev
6. Create a new user and switch to that user
adduser --disabled-login mastodon
Switch to the user
su - mastodon
7. Install Ruby using rbenv
git clone https://github.com/rbenv/rbenv.git ~/.rbenv
cd ~/.rbenv && src/configure && make -C src
echo 'export PATH="$HOME/.rbenv/bin:$PATH"' >> ~/.bashrc
echo 'eval "$(rbenv init -)"' >> ~/.bashrc
exec bash
git clone https://github.com/rbenv/ruby-build.git ~/.rbenv/plugins/ruby-build
Install the correct Ruby version.
Right now, from the official documentation, version Ruby v2.7.2 is used by Mastodon.
RUBY_CONFIGURE_OPTS=--with-jemalloc rbenv install 2.7.2
rbenv global 2.7.2
Install Bundler
gem install bundler --no-document
8. Return to root user
exit
9. Create a PostgreSQL user mastodon could use
sudo -u postgres psql
CREATE USER mastodon CREATEDB;
\q
10. Setting up Mastodon
Download the latest stable release of Mastodon
git clone https://github.com/tootsuite/mastodon.git live && cd live
git checkout $(git tag -l | grep -v 'rc[0-9]*$' | sort -V | tail -n 1)
Install Ruby and JavaScript dependencies:
bundle config deployment 'true'
bundle config without 'development test'
bundle install -j$(getconf _NPROCESSORS_ONLN)
yarn install --pure-lockfile
Generate the configuration by running the interactive setup wizard.
NOTE: This is where you will need the mail server details.
RAILS_ENV=production bundle exec rake mastodon:setup
Done!
Now, back to root user.
exit
11. Setting up NGINX
Copying the configuration template for Nginx from the Mastodon directory:
cp /home/mastodon/live/dist/nginx.conf /etc/nginx/sites-available/mastodon
ln -s /etc/nginx/sites-available/mastodon /etc/nginx/sites-enabled/mastodon
Now, opening nginx configuration and replacing ALL occurrences of example.com with the domain to be used: social.notgonnareveal.website
$EDITOR /etc/nginx/sites-available/mastodon
Verify the Nginx config and reload.
nginx -t
systemctl restart nginx
12. Acquiring a SSL Certificate
certbot --nginx -d notgonnareveal.website
This will obtain the certificate, automatically update /etc/nginx/sites-available/mastodon to use the new certificate, and reload nginx for the changes to take effect.
However, this messes up the Nginx configuration, and as a result, the site won't be reachable from the browser.
So, it's better to update the Nginx configuration with the following:
Note: replace ALL occurrences of domain mentioned here, with the domain to be used
map $http_upgrade $connection_upgrade {
    default upgrade;
    ''      close;
}

upstream backend {
    server 127.0.0.1:3000 fail_timeout=0;
}

upstream streaming {
    server 127.0.0.1:4000 fail_timeout=0;
}

proxy_cache_path /var/cache/nginx levels=1:2 keys_zone=CACHE:10m inactive=7d max_size=1g;


server {
    listen 80;
    listen [::]:80;
    server_name social.notgonnareveal.website;

    location /.well-known/acme-challenge/ { allow all; }
    location / { return 301 https://$host$request_uri; }

    return 404;
}


server {
    listen [::]:443 ssl http2 ipv6only=on;
    listen 443 ssl http2;
    server_name social.notgonnareveal.website;


    ssl_certificate /etc/letsencrypt/live/social.notgonnareveal.website/fullchain.pem;
    ssl_certificate_key /etc/letsencrypt/live/social.notgonnareveal.website/privkey.pem;
    ssl_dhparam /etc/letsencrypt/ssl-dhparams.pem;


    ssl_protocols TLSv1.2 TLSv1.3;
    ssl_ciphers HIGH:!MEDIUM:!LOW:!aNULL:!NULL:!SHA;
    ssl_prefer_server_ciphers on;
    ssl_session_cache shared:SSL:10m;

    keepalive_timeout    70;
    sendfile             on;
    client_max_body_size 80m;

    root /home/mastodon/live/public;

    gzip on;
    gzip_disable "msie6";
    gzip_vary on;
    gzip_proxied any;
    gzip_comp_level 6;
    gzip_buffers 16 8k;
    gzip_http_version 1.1;
    gzip_types text/plain text/css application/json application/javascript text/xml application/xml application/xml+rss text/javascript;

    add_header Strict-Transport-Security "max-age=31536000";

    location / {
        try_files $uri @proxy;
    }

    location ~ ^/(emoji|packs|system/accounts/avatars|system/media_attachments/files) {
        add_header Cache-Control "public, max-age=31536000, immutable";
        add_header Strict-Transport-Security "max-age=31536000";
        try_files $uri @proxy;
    }

    location /sw.js {
        add_header Cache-Control "public, max-age=0";
        add_header Strict-Transport-Security "max-age=31536000";
        try_files $uri @proxy;
    }

    location @proxy {
        proxy_set_header Host $host;
        proxy_set_header X-Real-IP $remote_addr;
        proxy_set_header X-Forwarded-For $proxy_add_x_forwarded_for;
        proxy_set_header X-Forwarded-Proto $scheme;
        proxy_set_header Proxy "";
        proxy_pass_header Server;

        proxy_pass http://backend;
        proxy_buffering on;
        proxy_redirect off;
        proxy_http_version 1.1;
        proxy_set_header Upgrade $http_upgrade;
        proxy_set_header Connection $connection_upgrade;

        proxy_cache CACHE;
        proxy_cache_valid 200 7d;
        proxy_cache_valid 410 24h;
        proxy_cache_use_stale error timeout updating http_500 http_502 http_503 http_504;
        add_header X-Cached $upstream_cache_status;
        add_header Strict-Transport-Security "max-age=31536000";

        tcp_nodelay on;
    }
        location /api/v1/streaming {
        proxy_set_header Host $host;
        proxy_set_header X-Real-IP $remote_addr;
        proxy_set_header X-Forwarded-For $proxy_add_x_forwarded_for;
        proxy_set_header X-Forwarded-Proto $scheme;
        proxy_set_header Proxy "";

        proxy_pass http://streaming;
        proxy_buffering off;
        proxy_redirect off;
        proxy_http_version 1.1;
        proxy_set_header Upgrade $http_upgrade;
        proxy_set_header Connection $connection_upgrade;

        tcp_nodelay on;
    }

    error_page 500 501 502 503 504 /500.html;
}
13. Setting up systemd services
Copy the systemd service templates from the Mastodon directory:
cp /home/mastodon/live/dist/mastodon-*.service /etc/systemd/system/
Finally, enable and start the systemd services.
systemctl daemon-reload
systemctl enable --now mastodon-web mastodon-sidekiq mastodon-streaming
Huzzah!
Congratulations! That's a success!
Now, the Mastodon instance can be viewed from the browser, using the domain.
Credits
This post can be said to be 95% plagiarized from the official installation docs of Mastodon.
The Cover is taken from mastdn.social, and all credits go to them.
Some comments from me
What's the use of an article which is 95% plagiarized from another source you may ask?
Well, for one, it will make the original article more popular but increasing its reach, i.e, free advertising.
Please check out the original article for the accurate and updated steps.
But, the more important point is that, although the steps read like an article, this is kinda-sorta a blog post for something which I have done in my spare time. And, since I followed the official documentation when I was trying it out on my own, it stands to reason that this blog post looks plagiarized.
Errors & Issues I faced
Choosing the wrong Droplet
Initially, I tried to deploy using the smallest droplet (1GB/5GB) possible, and it failed miserably. Mastodon requires more memory than that. The views would not compile with 1GB of memory.
Nginx headache
Using LetsEncrypt to get an SSL certificate automatically modifies the NGINX configuration, which results in conflicts. Once the conflicts were resolved, the site was still unreachable. In the end, after spending a lot of time on Google, StackOverflow, and niche websites & blogs, I figured out the optimal Nginx configuration.
Finally, and thankfully, that worked.
And, that's a wrap!
Well, if you've read till here, thanks for your time. Maybe, just maybe, we shall meet again on another post. Till then, bye. AFK.